Pages

.

Happy New Year!

The old year is almost over, and a new year is going to begin. I wanted to share this small video, a sum up on most of the creations I did during the summer to winter period this year.


I wish everyone a Happy New Year and a wonderful and fantastic beginning of the New Year!
reade more... Résuméabuiyad

Bead Embroidered Brooch

One more week and this year is at an end. I wanted to share this one little last christmas present I created for my mother-in-law.
It's a brooch made with bead embroidery. I haven't really made many brooches at all, this is the second one, the first one was that little rose I posted a couple of weeks ago.

The brooch was born in the simple way of "improvising", heh. What I did was that I dug through the small collection I have of assorted gemstone cabochons, and I ended up finding three really nice ones that looked good together. They were white and had a little bit of a mossy green (no idea if they are moss agates or not though, heh) color spread out here and there on them, and I actually liked the color combination so I decided to use the palette; white, olive green and amber as beads for the brooch.

At first I actually had a silhouette that I decided on in the beginning, BUT. As I bezelled the cabochons I just ended up putting beads in places and shapes that I saw fitting, so I ended up with something more abstract in the end anyway.

My mother-in-law liked it a lotm which made me very, very happeh :3
reade more... Résuméabuiyad

Call for Artwork!! (And Happy Holidays!!)

So, first and foremost, HAPPY HOLIDAYS!!  Whatever you celebrate, or don't, I hope this time of year is filled with peace, love, and joy for you and yours :)

I have been BUSY this season, and I'm loving every minute.  Recently, I premiered some brand new pieces in my shop: 
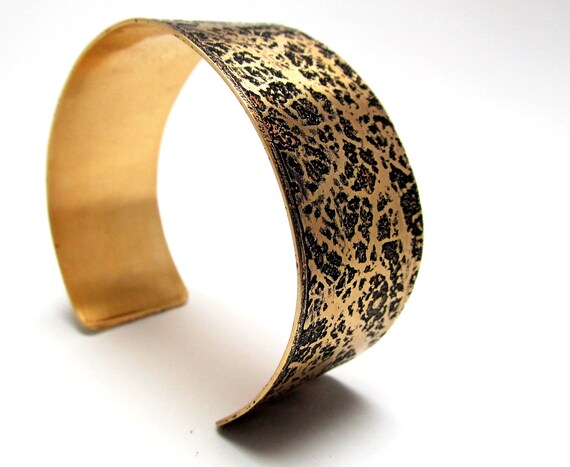
Etched Copper and Brass Cuff Bracelets.  I'm really excited to be offering these pieces.  They've been a blast to make, and I am just in love with how they look and feel.  Apparently I'm not the only one either--about 5 minutes after listing my favorite wide cuff in my Etsy Shop, a very nice gentleman from Georgia snatched it up.  This is my current favorite, a brass cuff with an organic crackled texture on the surface:
Brass Cuff
My plan is to make many many more, which brings me to the main point of my post :)

CALLING ALL ARTISTS!!

I want to feature your artwork on one (or more) of my cuff bracelets!

I don't care if you draw, paint, or make graphics on the computer.  I'm just looking for some awesome images to transfer onto metal.

Here's the skinny.  I use a process called acid etching to make the cuff bracelets.  Part of the process is transferring toner rich images from paper to metal to act as a resist.  All the areas of the metal covered with toner (or paint, or wax, etc, etc...) will be protected from the etching solution.  All the exposed areas will get cut away, creating recessed areas and awesome texture.  In the cuff above, all the bright brass areas were protected from the etching solution, while the dark areas were exposed.  Pretty cool, right?

I've managed to come up with some pretty cool designs that I really love, but now I'm interested in what you all might come up with.  Just about anything you can think up can be used; the only real requirement is that the image has to be black and white.  JUST black and white, no gray areas.  The black areas are what will protect the metal, and gray just doesn't hold up.


Crisp images like this one are perfect.  There can be a lot of detail, or not, so long as the black lines are strong and dark, and the white areas are crisp and clean. 

Images like the one below won't work because the gray shaded areas won't be protected well during the etching process.  Thin black lines are also not an ideal fit for this project.


Getting the idea?  I hope so.  Anyway, anyone who wants to is more than welcome to submit artwork.  I'd prefer high quality digital files since the crisper the image, the crisper the transfer, but I can generally make whatever you want to send in work.

What size should the image be?
  • Full size cuffs are made from strips of metal that are 6 inches long, and from 1/2 to 2 inches wide.  
  • Half size cuffs are about 2 1/2 to 3 inches long, and approximately 1 inch wide.
  • Ring stock is about 3 inches long, and 1/4 to 1/2 inch wide.
  • Earring stock is about 1/4 to 1/2 inch wide, and can be up to 2 inches long.

It'd be awesome if you could size your images to fit these dimensions, because if I resize them, they could become less crisp, which would be a big bummer.

What do I get in return for sharing my super cool artwork?
Everyone who submits a piece of art work (whether or not I use it) will be entered to win a gift certificate to use in my shop.  And if I end up using your art, I'll credit you in the item description, on FB, and on the care card that's included with the piece featuring your work.  I'll also give you first dibs on whatever jewelry I make using your design.

Sounds great!  Where do I send my stuff?
Email it to me!  Send all submissions to jewelry_gal85@yahoo.com
Please put "Artwork Submission" in the subject line so I know you aren't spam.  Also, include your name, email address, and website (if you have one) with each submission. 
Just about any file type should work, but I'd prefer a .jpeg  or .png file.  PDFs, Word documents, and high definition scans of hand drawn images are fine as well.

The Fine Print
I'll be drawing the gift certificate winner on Friday, January 25th, 2013.  You can submit as many images as you'd like, but your name will only be entered into the drawing once.

If you're sending me artwork, it must be your own.  Seriously, don't steal images from the web and say it's yours, that's called copyright infringement and it's against the law.  Plus, how would you feel if someone stole your stuff?  So, original work only, please.  You CAN use open source materials, but original is (almost) always better.  By submitting artwork to me, you are certifying that you have the right to use and distribute it.

By sending in artwork, you are agreeing to allow me to use (or not use) the image as I see fit.  This means the image may be re-sized, reshaped, or re-purposed as needed to fit the project.  It also means you are giving me the rights to sell any and all projects featuring your artwork with no financial obligation to you, other than what's mentioned above.

Submissions constitutes a binding contract for non-exclusive rights to your image(s).  You may sell, distribute, and otherwise share your image(s) however you like, though it'd be great if you didn't go handing them out to other jewelry artists.

And that's that.  I can't wait to see what you all come up with!  Be sure to stay tuned.  I've got a TON of exciting new projects in mind for the new year!

Happy Holidays!

-Heather
reade more... Résuméabuiyad

Necklace: Marie Antoinette

It's Done!!!!

Managed to finally finish up my necklace, inspired by Marie Antoinette yesterday :)

I must say it's been an interesting journey, completing this piece. I think I started on it sometime around June/July. I had this brass cuff collar that I bought some time ago from "Robin's Beads" and I wanted to make something on a scale that I've never done before. In short I wanted to make a big two piece necklace, with a piece that would be attached to the collar.
I decided to begin my journey with focusing on the part that would be attached to the collar, and cause of the inspiration, I wanted to make a baroque inspired silhouette for it. The main colors I had in mind from the very beginning were mainly pink and peach in different shades. After doing the bezels for the cabochons I already had glued down, I ended up with an artist's block, so I felt that I had to put it away for some time.

I took it out again when the inspiration sprouted out again, and this time I actually decided to add some more colors to give the piece a lot more contrast; moss green iris, lavender and amethyst with gold luster beads.
I ended up finishing this piece in a couple of weeks after working on it. I actually posted the w.i.p photo's on my facebook page as I went a long, and they are still there for those who are interested in having a peek :)

I actually had a living hell making a template for the collar, lol! No, really. It's so big and wide and already shaped so I kinda had to use sticky tape, double fold it and attach it onto the collar and carefully press it down on a paper AND THEN draw around the edges of it onto the paper.
The biggest sample of Lacy's Stiff Stuff actually isn't big enough for this collar model, so I had to improvise. After I drew out the shape from my newly made template onto the beading foundation I took another piece of foundation and angled it next to the other one. I added some E6000 to the edges of each one of the two foundations and pressed them together, and I smoothed out the glue over the area of where two pieces met to make it extra secure.
My experiment actually worked and after the glue had dried the two pieces ended up together as if they'd always been there.

 I took a small break at this point, before starting to work on the collar. I wanted to make some Christmas presents to send up to some special ones, home in Sweden, making sure that they would have them on time before the 24th (we celebrate Chrsitmas EVE in Scandinavia, not Christmas Day like most other countries do, heh), and they received their gifties last week :)

When I started on the collar, I knew I wanted something sparkly and not too many details, as the other part has a lot of details. I incorporated a couple Swarovski rivolies as the focal point for it, and then I began to pretty much work from there. The design of it evolved as I worked on it. At some point however, I decided to also add a smaller feather on each side of the collar that would match up with the big feather I created on the first piece.

After finishing the collar, gluing it onto the brass piece and edging it with brick stitch I went back again to the first piece to create a fringe. One of the things I personally find hard to create is a really good fringe, lol. I find myself sometimes in a bit of a problem when doing this, depending on how the bottom shape of whatever I'm fringing looks like.
In the end I managed to come up with something awesome. I wanted something more irregular, so I chose what kind of beads I wanted to add and how; freshwater pearl, swarovski bicone crystal, 4mm firpolished bead and 3mm firpolished bead. Going from there I decided to add some 11/0 seed beads in the rose tea AB colored beads, and when I would turn up again to secure the fringe I worked peyote stitch on the seed beads laying in between those focal beads I mentioned earlier.

When the fringe was completed, it was time to finish the whole piece. After some comparing I ended up attaching the pieces with two 11/0 seed beads and an 8mm south sea shell pearl in between them.

I'm probably not gonna post another blog update before Christmas, I'm not sure :) 
But in case...
I wish you all a wonderful Christmas  
reade more... Résuméabuiyad

What Is Jewellery

Jewellery is a personal ornament, such as a Necklace, Ring, or Bracelet, made  from Gemstones, Precious metal or other materials. The word jewellery is derived from the word jewel, which was anglicised fro the old French "jouel" circa the 13th century.
Furhter tracing leads back to the Latin leads back to the Latin word "jocale", meaning plaything. Jewellery in one of the oldest forms of body adoment, recently found 100,000 year old beads made from Nassarius shells are thought to be the oldest know jewellery.
Although during earlier times jewellery was created for practical uses such as wealth, storage and pinning clothes together, in recent times it has been used almost exclusively for decoration. The first pieces of jewellery were made from natural materials, such as bone, animal teeth, shell, wood and carved stone. Jewellery was often made for people of high importance to show their status and, in many cases, they were buried with it.
Jewellery has been made to adorn nearly every body part, from hairpins to toe tings and many more types of jewellery. While high-quality is made with gemstones and precious metals, there is also a growing demands for art jewellery where design and creativity is prized above material value. In addition, there is the less-costly costume jewelleery, made from less-valuable materials and mass-produced. New variations include wire sculpture jewellery, using anything from base metal wire with rock tumbled stone to precious metals and precious gemstones.
reade more... Résuméabuiyad

Marie Antoinette Update V

Thought I would share another update of my Marie Antoinette piece.
I've been working on it all week, and the collar part is almost done :)

I want to keep the collar pretty symmetrical since the other part of the necklace is pretty abstract. I planned on making both sides pretty much the same though :p

If you wish to see even more picture of the process, they can all be accessed on either my personal FB or on my FB page.
reade more... Résuméabuiyad

The Holiday's are Here

So, once again, I've been terribly neglectful of this poor blog.  Eventually I'll get with the program and remember to post here more than once every month or so.  Honest, I will.

Thought I'd post a quick update on how things are going.  The holiday season is most definitely in full swing, and my Etsy business is doing fairly well for its first year out.  Black Friday/Cyber Monday sales more than doubled my in shop sales in months prior.  I went from 12 to 29 sales in 4 days :)  And one of those orders was fairly large, which is always nice.

Here are the 2 most popular items so far:
Mixed Set of 4 Silver Stacking Rings

Set of 3 Textured Copper Rings


I did the math on Tuesday and realized that if I kept selling at the same pace (2-3 sales/day) I would have over 100 sales by the end of the year.  But, naturally, that volume of sales doesn't seem to be in the cards for me, so I've set a goal of 50 sales by year's end instead.  That's only 31 more sales.  Totally do-able.  I hope.  You know what they say about shooting for the moon...

Even with all the activity and excitement in my shop, I've been spending a lot of time working on new projects.  I haven't decided if I'm going to launch these new items before or after the holidays, but either way I'm wicked excited about them.  I recently taught myself how to etch on metal, and I'm totally in love with the results I've been getting.  I thought etching would be a big complicated process, but as it turns out, it's actually really easy to do.  With some copper and brass blanks, a laser printer, and some etching solution, awesome things are possible.

Post Etching
 This is a brass blank that's destined to be a cuff bracelet by the time I'm through.  In the photo above, you can see the piece fresh from the etching solution.  The black marks you see are the resist--the material applied to the metal to protect it from the etching solution.  The areas that don't have any black marks become recessed areas, which you can see much more clearly in the close up photo below.

Close up before cleaning

Close up after cleaning
 In the picture above, you can see the raised areas still bright and shiny.  These areas are where the resist protected the metal.  The lower areas have a neat texture to them, as well as a slightly different coloring.  The picture below is a ring blank fresh from the etching solution with the resist just cleaned off.

Copper Ring blank post etching
 And then, with a little magic, a little soldering, and a little wax, this is what I decided to use the ring blank for.  After forming the ring, I used a sharpie marker to color in the recessed areas, bringing a little more depth and definition to the awesomely cool texture.  Then I cleaned things up and buffed the whole ring with a little bit of Renaissance Wax.  The wax will help keep the ring from tarnishing, and from turning peoples skin green.
Copper Wide Band Ring using the etched ring blank


Angled Front View of the "All You Need is Love" Copper Cuff

And last but not least, here's one of the finished cuffs.  This was the only cuff I attempted to put any writing on.  It says: "All you need in love."  I wish I had left the metal in the solution a little bit longer to give the writing a little more depth, but I'm pretty pleased with how it turned out.

Angled Right View of the "All You Need is Love" Copper Cuff

As with any new project, I still have a few kinks to work out, but I'm really excited with how things are going.  I've had so much fun experimenting with new techniques in metal working, and there's still so much more to try.

Since I'm notoriously terrible at remembering to update here very often, I end this post by wishing you all happy holidays from Little Hill Jewelry!


reade more... Résuméabuiyad